安裝設定IPv6 Ready Logo Phase-2 Conformance Test Platform for Host
公司產品類型都屬於Host,參考中華電信的講義設定,因為銀質標章(Phase-1)到2011/09不再接受申請(以後只有金質標章申請),所以目前整理出Phase-2安裝設定步驟為主要重點。在中華電信IPv6測試實驗室提到未來Phase-3(規劃中)測試項目為Phase-2 Core測試+IPSec(必測)。
測試平台名稱:
TN:Tester Node,符合性測試平台。
NUT:Node Under Test,待測機器。
使用PC的硬體:
堪用即可,使用公司兩台電腦Dell OptiPlex 320,兩台電腦網路線直接互連測試。
作業系統:
FreeBSD 8.2-RELEASE。
TN設定安裝步驟:
1.安裝FreeBSD,選擇自定安裝,只裝base、kernels、man、ports。安裝完畢,登入root先改密碼和編輯/etc/rc.conf的網卡連線設定。
2.安裝桌面,在此選用gnome2。
先裝Xorg:
# pkg_add -r xorg再裝gnome2:
# pkg_add -r gnome2安裝完畢,輸入:
# echo exec gnome-session > ~/.xinitrc之後輸入startx可直接進入桌面。如果要開機自動進入桌面,在/etc/rc.conf加入:
gdm_enable="YES"如果進入桌面後,鍵盤滑鼠無法使用,在/etc/rc.conf,加入兩行設定:
hald_enable="YES"
dbus_enable="YES"
建立新的xorg.conf組態設定檔:(這步驟可做可不做)
# cd /root; Xorg -configure
# Xorg -config xorg.conf.new -retro (測試xorg.conf.new組態設定檔,按Ctrl + Alt + F1離開)
# cp /root/xorg.conf.new /etc/xorg.conf
3.進入桌面後,開啟終端機,先檢查是否有安裝perl或已安裝的版本(裝xorg時就會先裝perl了):
# pkg_info grep "perl"
p5-Time-HiRes-1.9721,1 A perl5 module implementing High resolution time, sleep, an
perl-5.10.1_3      Practical Extraction and Report Language
雖然中華電信講義是用perl 5.8.9,不過經實際測試,perl 5.10.1也可以使用。確定perl已安裝過,再安裝其相關模組。
4.v6eval Requirement(測試Core/IPSec/MIPv6/NEMO/DHCP/SNMP要安裝):目前只有Phase2-Core是必測,其他選測。
Expect:
# cd /usr/ports/lang/p5-Expect
# make install
Digest-MD5:
# cd /usr/ports/security/p5-Digest-MD5
# make install
Digest-HMAC (DHCPv6 only):
# cd /usr/ports/security/p5-Digest-HMAC
# make install
YAML:
# cd /usr/ports/textproc/p5-YAML
# make install
5.KOI Requirement(測試SIP/SNMP/IKEv2/DNS要安裝):目前為選測項目,可依需求安裝。
ipsec-tools:
# cd /usr/ports/security/ipsec-tools
# make install
Expect(v6eval已安裝過,可略過):
# cd /usr/ports/lang/p5-Expect
# make install
Socket6:
# cd /usr/ports/net/p5-Socket6
# make install
Crypt-DH:
# cd /usr/ports/security/p5-Crypt-DH
# make install
Crypt-DES_EDE3:
# cd /usr/ports/security/p5-Crypt-DES_EDE3
# make install
Crypt-Radom:
# cd /usr/ports/security/p5-Crypt-Random
# make install
Crypt-Rijndael:
# cd /usr/ports/security/p5-Crypt-Rijndael
# make install
Crypt-OpenSSL-RSA:
# cd /usr/ports/security/p5-Crypt-OpenSSL-RSA
# make install
Crypt-OpenSSL-X509:
# cd /usr/ports/security/p5-Crypt-OpenSSL-X509
# make install
Digest-MD5(v6eval已安裝過,可略過):
# cd /usr/ports/security/p5-Digest-MD5
# make install
Digest-HMAC(v6eval已安裝過,可略過):
# cd /usr/ports/security/p5-Digest-HMAC
# make install6.到TAHI Release下載v6eval-3.3.2.tar.gz解壓縮安裝(千萬不要用ports安裝v6eval,因為版本過舊都未更新):
# tar zxvf v6eval-3.3.2.tar.gz
# cd v6eval-3.3.2
# make
# make install安裝於/usr/local/v6eval目錄,以後如有新版,同樣步驟直接覆蓋檔案。
到TAHI Release下載koi-2.2.0.tar.gz解壓縮安裝(目前為選測項目,可依需求安裝):
# tar xfvz koi-2.2.0.tar.gz
# cd koi-2.2.0
# make
# make install
# make -f Makefile.cert install到TAHI IPv6 Ready Logo Phase-2 Test下載Self_Test_5-0-0.tgz解壓縮(不用安裝):
# tar vxfz Self_Test_5-0-0.tgz7.編輯/etc/rc.conf,並加入以下三行:
#設定要連線的網卡。
ifconfig_bfe0="up"
#TN-Make bpf special device。
devfs_system_ruleset="devfsrules_unhide_bpf"
#ipv6關閉(因為要使用v6eval來替代)。
ipv6_enable="NO"8.新增一個/etc/devfs.rules,內容如下:
[devfsrules_unhide_bpf=1025]
add path "bpf0" user root group wheel mode 0660 unhide
add path "bpf1" user root group wheel mode 0660 unhide
add path "bpf2" user root group wheel mode 0660 unhide
add path "bpf3" user root group wheel mode 0660 unhide
add path "bpf4" user root group wheel mode 0660 unhide
add path "bpf5" user root group wheel mode 0660 unhide
add path "bpf6" user root group wheel mode 0660 unhide
add path "bpf7" user root group wheel mode 0660 unhide9.編輯/usr/local/v6eval/etc/tn.def
#RemoteDevice在FreeBSD 8.2為cuau0,其他版本可到/dev/查詢。
#RemoteDevice  cuau0
#RemoteDebug  0
#RemoteIntDebug  0
#RemoteLog  1
#RemoteSpeed  0
#RemoteLogout  0
#RemoteMethod  serial
#以上如果使用RS-232C登入才需要設定。
#建議開啟只抓取ipv6封包,縮小測試報表檔案大小。
filter  ipv6
#bfe0為連線網卡代號。
Link0 bfe0 00:00:00:00:01:00編輯/usr/local/v6eval/etc/nut.def
#手動測試設為manual。
System    manual
#待測產品型號(可隨意填寫,送審時需正式填寫)。
TargetName  FreeBSD 8.2-RELEASE
#待測產品名稱(可隨意填寫,送審時需正式填寫)。
HostName  ipv6-test
#待測產品類型。
Type    host
#設定帳號密碼,如果是手動測試,可忽略。
#User    root
#Password  12345
#設定待測產品網卡代號(可隨意填寫),和MAC Address。
Link0 bfe0 00:13:72:39:f8:9c如果使用一般帳號測試,需編輯/etc/group,修改wheel(如果一般帳號已加入wheel群組,則不需要此步驟):
#abc為一般帳號,加到wheel群組才能su。
wheel:*:0:root,abc
NUT設定:
10.設定另一台FreeBSD為NUT。
編輯/etc/rc.conf,加入或修改以下兩行:
ifconfig_bfe0="up"
ipv6_enable="YES"
登入帳號至少要是Super-user帳號(wheel群組)。
11.TN和NUT都要移除/etc/resolv.conf、/etc/rtadvd.conf。移除DNS setting、IPv4 default route、IPv6 default route、static IPv6 routing(如果/etc/rc.conf沒有設定,就直接忽略)。移除以上設定是為了避免影響測試結果。
12.從command line進入Self_Test_5-0-0目錄,內有spec.p2、nd.p2、addr.p2、pmtu.p2、imcp.p2五個測試目錄(項目)。進入各目錄輸入指令開始Phase-2測試:
# make clean
# make ipv6ready_p2_host
單項或局部測試:
# make clean
# make AROPT="-s 17 -e 24" ipv6ready_p2_host
從第17項測試到第24項。
13.測試中比較需要注意的地方:
lio_start
reboot> Reboot NUT.
reboot>     * Wait until NUT boot up completely.
reboot>         Ex.) Wait until catch up login prompt.
reboot>
reboot> Press Enter key for continue.
lio_stop
將NUT重開機到待機畫面,TN按Enter鍵繼續測試。
lio_start
reboot_async> Reboot NUT.
reboot_async>     * You don't need to wait NUT untill boot up completely.
reboot_async>     * You have to exit this script quickly.
reboot_async>     * This script is used for catching up boot sequence.
reboot_async>         Ex.) DAD, MLD Report, ...
reboot_async>
reboot_async> Press Enter key for continue.
lio_stop
將NUT關機,TN按下Enter鍵,NUT重開機後自動偵測到網路連接。
lio_start
ping6> Press enter key, and excute the following commands within 5 seconds.
ping6> Do ``ping6  DataSize= 1352, Send Count= 1, Interface= bfe0, Destination= FF1E::1:2''
lio_stop
這時得先在NUT輸入好ping6指令,之後在TN按下Enter鍵5秒內,NUT也馬上按下Enter鍵進行ping6動作,以上述訊息為例,在NUT輸入:
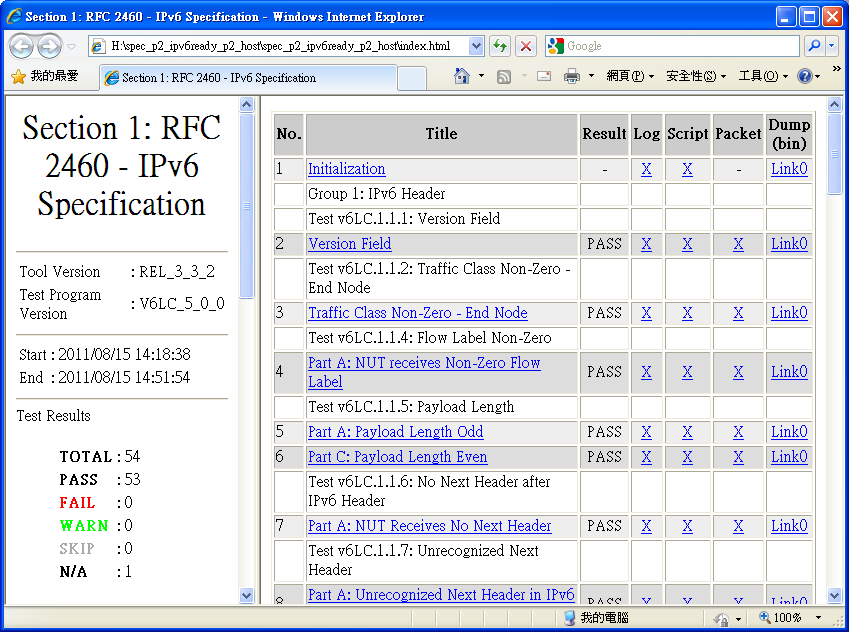
# ping6 -s 1352 -c 1 -I bfe0 FF1E::1:2每一大項目測試完畢都會輸出report,細部項目報告為1.html,主要項目報告為index.html、report.html、summary.html。建議直接將整個測試目錄複製到新的路徑,因為還有內含其他附加檔案(檔案多又複雜),例如Script、Packet、Dump(bin)。以下為spec.p2項目的測試結果:
Self-Test Sample Result for Host:
http://www.tahi.org/logo/phase2-core/result/Self_Test_4-0-3/freebsd71.host/
最後請注意:送審的report,一定得是測試程式更新到最新版所測試出來的結果。